

Introduction
Capturing high-quality clinical photographs is essential for accurately documenting and showcasing the results of hair restoration procedures. By following best practices and utilizing the right equipment and techniques, practices can ensure consistent, professional-looking images that effectively demonstrate their expertise and outcomes.
Recommended Equipment

High-resolution digital camera or smartphone with excellent image quality, such as a Canon EOS R or iPhone 13 Pro

Proper lighting setup, such as ring lights or softbox lights, to ensure even illumination and minimize shadows

Tripod for stability and consistency, like the Manfrotto Compact Action Tripod

Neutral, solid-colored backdrop, like a light blue or gray seamless paper, to eliminate distractions and maintain focus on the patient’s scalp
Camera Settings and Techniques

Use a high shutter speed (1/125th of a second or faster) to minimize motion blur and ensure sharp images

Maintain a consistent white balance (around 5500K) to accurately represent skin tones and hair color

Set the aperture to a moderate value (e.g., f/8) for optimal depth of field and clarity

Utilize manual focus to guarantee sharp focus on the area of interest, particularly when capturing close-up shots of the hairline or crown
Patient Positioning and Framing

Position the patient at a consistent distance (about 3 feet) from the camera to maintain scale and proportion across all photos
Use a grid overlay or guide marks, like the Rule of Thirds, to ensure proper alignment and framing of the patient’s head
Capture standard views, such as frontal, vertex, and rear, to provide a comprehensive assessment of the scalp and hairline
Include relevant anatomical landmarks, such as the eyebrows or ears, to provide context and scale for evaluating the extent of hair loss and restoration results
Tips for Specific Types of Shots

Frontal view: Ensure the patient’s face is centered and the hairline is clearly visible, with the top of the head aligned with the upper third of the frame
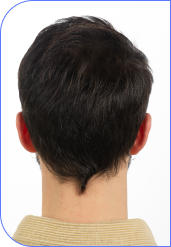
Rear view: Position the camera slightly above the patient’s head to capture the back of the scalp and the occipital region, showcasing the density and distribution of transplanted hair

Vertex view: Capture the crown area by having the patient tilt their head slightly forward, focusing on the point where the hair whorl or swirl pattern is most apparent
Keep In Touch
Sign up for emails for updates and special events.
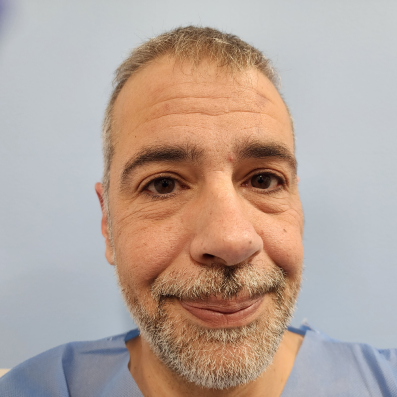
For example, when preparing for his own 2,200 graft procedure in November 2023, our very own Joe Grraffo, VP of Practice Relations, followed these guidelines to document his hair restoration journey. Joe graciously allowed us to use his photos from his journey as instructional guides. While he isn’t exactly thrilled we did this, we think it really completes the page, right? 🙂
When reviewing before and after photos, patients should look for consistency in lighting, angles, and distance. Be mindful of excessive editing, which can unnaturally smooth skin texture or distort features. While videos may not provide the same level of detail as still photos, they can offer a better sense of proportion and perspective.
By adhering to these best practices, investing in high-quality equipment, and continuously refining their techniques through regular training and feedback, hair restoration practices can capture stunning clinical photographs that accurately represent their work and attract prospective patients. Remember, the goal is not just to take pictures, but to create a powerful visual narrative that showcases the life-changing impact of your hair restoration expertise.
Photography Series
- The Ultimate Guide to Photography
- HIPAA and Patient Consent
- Professional Hair Restoration Photography
- De-Identification and HIPAA Compliance in Hair Restoration
